name = INFRA-Provision | version = 0.1.0 | accountable = Rogério Schneider | depdency = ContextNet, OpenSplice, RTI, Linux
Automated Infrastructure
INFRA-Provision
- Installs and validate basic infrastructure configuration for LAC servers
- Automates build process for LAC software
Works great with Vagrant/VirtualBox, cloud VMs and physical servers running Ubuntu.
Fundamentals
We are using a set of tools to setup, build and deploy ContextNet services to newly installed machines, with what we call “vanilla” Operating Systems (default configuration, no previous installed or required software).
To accomplish this automated deploy process, we define some premises, as follows:
1. User must setup his own machine with some basic toolset. This process is also automated and should be done using RVM (The Ruby Version Manager) and it's Gemfiles, used to define the versions of helper tools.
  2. Capistrano is the main helper tool, used as a control center to run local and remote commands, such as setup, build and deploy.
  3. You must have Java, Ant and Maven installed, and your JAVA_HOME variable should be correctly set.
  3.1. Java is used to compile the source code for ContextNet.
  3.2. Ant is used to build the jars (build.xml is it's recipe file).
  3.3. Maven is used to locally install the generated jars (not mandatory).
  3.4. If you use Maven in other projects, you can refer to the built ContextNet jars in your pom.xml and your local Maven repository (~/.m2/repository) will provide our lib to your local environment.
4. Vagrant is another helper tool and is used to provision local VMs within VirtualBox, automatically configuring the network and shared folders to conventioned, well-known parameters.
Main steps
These are the main steps we take to deploy a new server.
  1. Install vanilla OS, Debian based. Tested with Ubuntu:
  1.1. 14.04 64 bits
  1.2. 12.04 32 bits
  2. Bootstrap the server with correct SSHd configuration and your SSH public key
  3. Build needed ContextNet software
  4. Setup/configure the newly installed server
  5. Deploy the built software to server
  6. Restart services
  6. Test deployed infrastructure
All steps are done using just a few commands:
  cap <stage> bootstrap
  cap <stage> deploy
How-to start
- Use Ubuntu
- If just running the build, you may use MacOS X (or even Cygwin for Windows - untested).
- Prefer using Bash as you shell (should work on ZSH too but we had some trouble in an initial attempt).
- Install RVM (Ruby Version Manager)
- After RVM is installed, we need to load it and install the Ruby interpreter
  rvm reload                        # load newly installed RVM - should not be necessary in new terminal sessions since your .bashrc should be changed by RVM installation
  rvm install $(cat .ruby-version)  # install Ruby 2.x.x - must be run only once
  cd ..                             # go to another dir
  cd -                              # when you come back (or every time you enter this project's directory)
  rvm current                       # you must see the loaded gemset: ruby-2.x.x@infra-provision
  gem list                          # you should see the default set of dependencies
  bundle                            # install Ruby dependencies - must be run only when Gemfiles are changed
  gem list                          # now you should see all Ruby dependencies installed (defined in Gemfile and Gemfile.lock)
- SSH Keys
To facilitate the remote commands execution, you should insert your SSH public key in the file: `provision/data/authorized_keys` so you can use the `-s keys` option as in `cap <stage> deploy -s keys` and you will not be asked to type your password for every remote interaction.
- Now that we are set, just run some commands and get comfortable
  cap help                          # this is the Capistrano help
  cap build                         # build the ContextNet jars
  cap <stage> bootstrap             # initiate the server with SSH credentials so we can do the real setup in the next command
  cap <stage> deploy                # setup server(s), build ContextNet (if needed) and deploy the Gateway services (OpenSplice and RTI)
  cap <stage> restart               # remotely restart services running in the server(s)
  cap <stage> serverspec            # validate deployed infrastructure
You should now have a control center for your servers, running directly from your local terminal.
A word about SSH keys
Please identify your key with your e-mail at the end. Follow the example of other keys already set in the project.
Mind that your key may be the same used to push to Git remotes, as the SSH keypair is personal (hence, should be reused in many machines as you feel like) and is not server bonded (thus, you should not generate new keypairs for each new machine you use or visit). As a general rule, you must only be careful with your private key, the public key may be distributed with no concerns.
A word about Capistrano stages
A stage is the definition of an environment, composed by servers and it's roles. File `config/deploy/<stage>.rb` defines such configurations.
An example of stage is `lacobd`, defined in `config/deploy/lacobd.rb`, composed by two servers (lacobd.cloudapp.net and lacobd2.cloudapp.net) running most of the available roles (:base, :ospl, :rti, :sddl).
Generic stages are `localhost` and `vagrant`, pointing to local installations in such a way that can be reused locally by any user. If needed, you can create your own stages by adding a new file to the project.
Using command line utility
  # Basic layout for Capistrano commands
    cap <stage> <action>
  # Custom actions - cap -T
    cap bootstrap                # => Prepare host for installation.
    cap build                    # => Build all jars.
    cap build:all                # => Build contextnet-all-VERSION.jar.
    cap build:clientlib          # => Build contextnet-clientlib-VERSION.jar.
    cap build:coreserver_full    # => Build contextnet-coreserver-full-VERSION.jar.
    cap build:coreserver_minimal # => Build contextnet-coreserver-minimal-VERSION...
    cap clean                    # => Remove temporary local files.
    cap help                     # => Help.
    cap integration              # => Integration tests.
    cap restart                  # => Restart services.
    cap serverspec               # => Test host installation.
    cap teardown                 # => Uninstall (CAUTION!!!).
  # Provision / Deploy - action deploy is the main task in Capistrano
    cap <stage> bootstrap [-s keys] [<bootstrap_user>_pass="password"]
    cap <stage> deploy [-s keys] [root_pass="password"]
  # Restart
    cap <stage> restart [-s keys] [root_pass="password"]
  # Tips
    - Use option "-s keys" to avoid password prompt and authenticate using SSH keys
    - Or export "$root_pass" environment variable with the correct password
  # Valid stages - located at config/deploy/<stage>.rb
  # The stage defines custom servers and configurations to be deployed
    - lacinfra
    - lacinfratest
    - lacobd
    - localhost
    - vagrant
  # Examples
    cap build
    cap build force_ref=master
    cap lacinfratest bootstrap
    cap lacinfratest deploy
    cap lacinfratest deploy -s keys
    cap lacinfratest deploy -s keys force_ref=master
    cap lacinfratest restart
    cap lacinfratest restart -s keys
    cap lacinfratest serverspec
    cap lacinfratest serverspec -s keys
    cap lacinfratest integration
    cap lacinfratest integration -s keys
    cap lacinfratest integration -s keys integration_local_to_remote=true
    cap lacinfratest integration -s keys integration_local_to_remote=true force_ref=master
    cap lacinfratest teardown
Adding a new repository to monitor, build and deploy
When you need to add a new component to the build process, you need to modify as follows:
- Add the new repository to some of the existing jars (contextnet-clientlib, contextnet-coreserver-minimal, contextnet-coreserver-full or contextnet-all).
- File config/build.rb
  # all
  desc '=> Build contextnet-all-VERSION.jar.'
  task :all, :roles => nil, :on_no_matching_servers => :continue do
    # Packages for this build.
    # ...
    repo current_mod, 'ext-mtd',
      :git => 'git@bitbucket.org:endler/ext-mtd.git', :ref => '2.1.0'
    repo current_mod, 'core-gateway',
      :git => 'git@bitbucket.org:endler/core-gateway.git', :ref => '2.1.0'
    repo current_mod, 'ext-poamanager',
      :git => 'git@bitbucket.org:endler/ext-poamanager.git', :ref => '2.1.0'
    repo current_mod, 'core-groupdefiner',
      :git => 'git@bitbucket.org:endler/core-groupdefiner.git', :ref => '2.1.0'
    # Dependency packages for every build.
    # All jars must include this package list.
    repo current_mod, 'core-mrudp',
      :git => 'git@bitbucket.org:endler/core-mrudp.git', :ref => '2.1.0'
    repo current_mod, 'core-clientlib',
      :git => 'git@bitbucket.org:endler/core-clientlib.git', :ref => '2.1.0'
    repo current_mod, 'ext-adaptivemiddleware',
      :git => 'git@bitbucket.org:endler/ext-adaptivemiddleware.git', :ref => '2.1.0', :path => 'AdaptiveMiddleware'
    repo current_mod, 'core-universalddsinterface',
      :git => 'git@bitbucket.org:endler/core-universalddsinterface.git', :ref => '2.1.0'
    repo current_mod, 'core-highlyscalablecollections',
      :git => 'git@bitbucket.org:endler/core-highlyscalablecollections.git', :ref => '2.1.0'
- Insert the new component into the build recipe. Depending on what you are adding, you may skip this step.
- File build.xml
- Add the new repository to the contextnet-master-trigger job in Jenkins.
1. First open the configuration of the main job trigger.
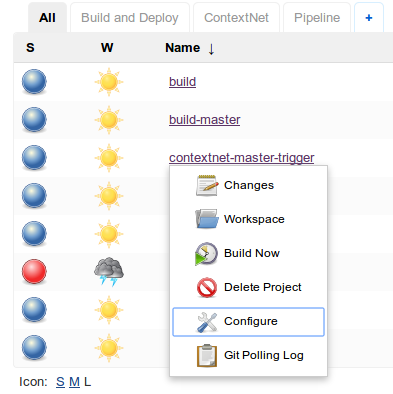
2. Then go to the last repository in the list.
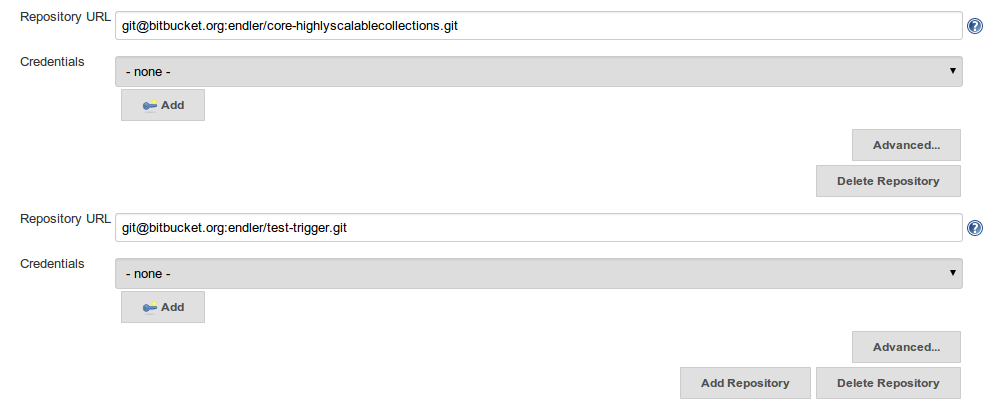
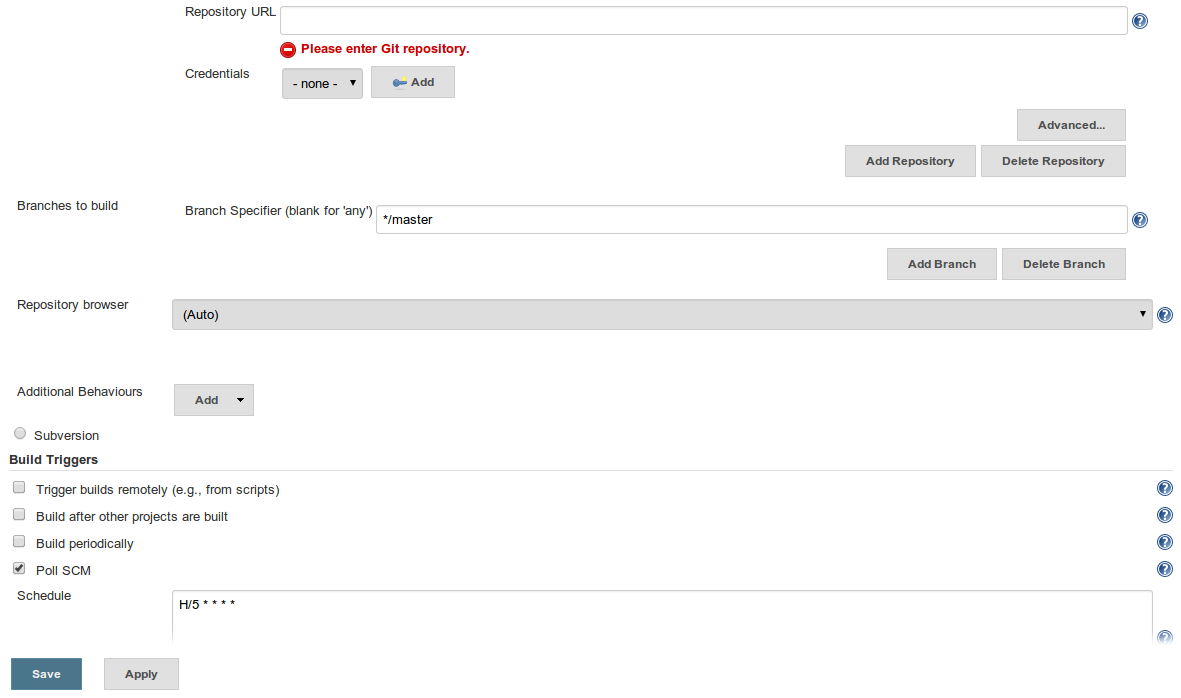
3. And click "add repository".

4. After you insert your new Git repository to be monitored, just save the configuration.
You may also want to sync the new configuration to the INFRA-Provision repository:
  ci/download-config.sh
  git add provision/rootfs-ci/home/lac/.jenkins
  git commit -am 'Jenkins config save'
  git push
Important links
- Git repository INFRA-Provision - Source code and command line utilities.
- CI main painel - Painel showing continuous integration tests results with color code.
- Pipeline painel - Painel with chain of tests dependency.
- Pipeline painel full screen - Painel with chain of tests dependency in full screen.
- Build and deploy jobs - Selected list of CI jobs.
- Wall Display - List of tests status for big displays.
Contact
- Rogério Schneider: rschneider@inf.puc-rio.br / stockrt@gmail.com